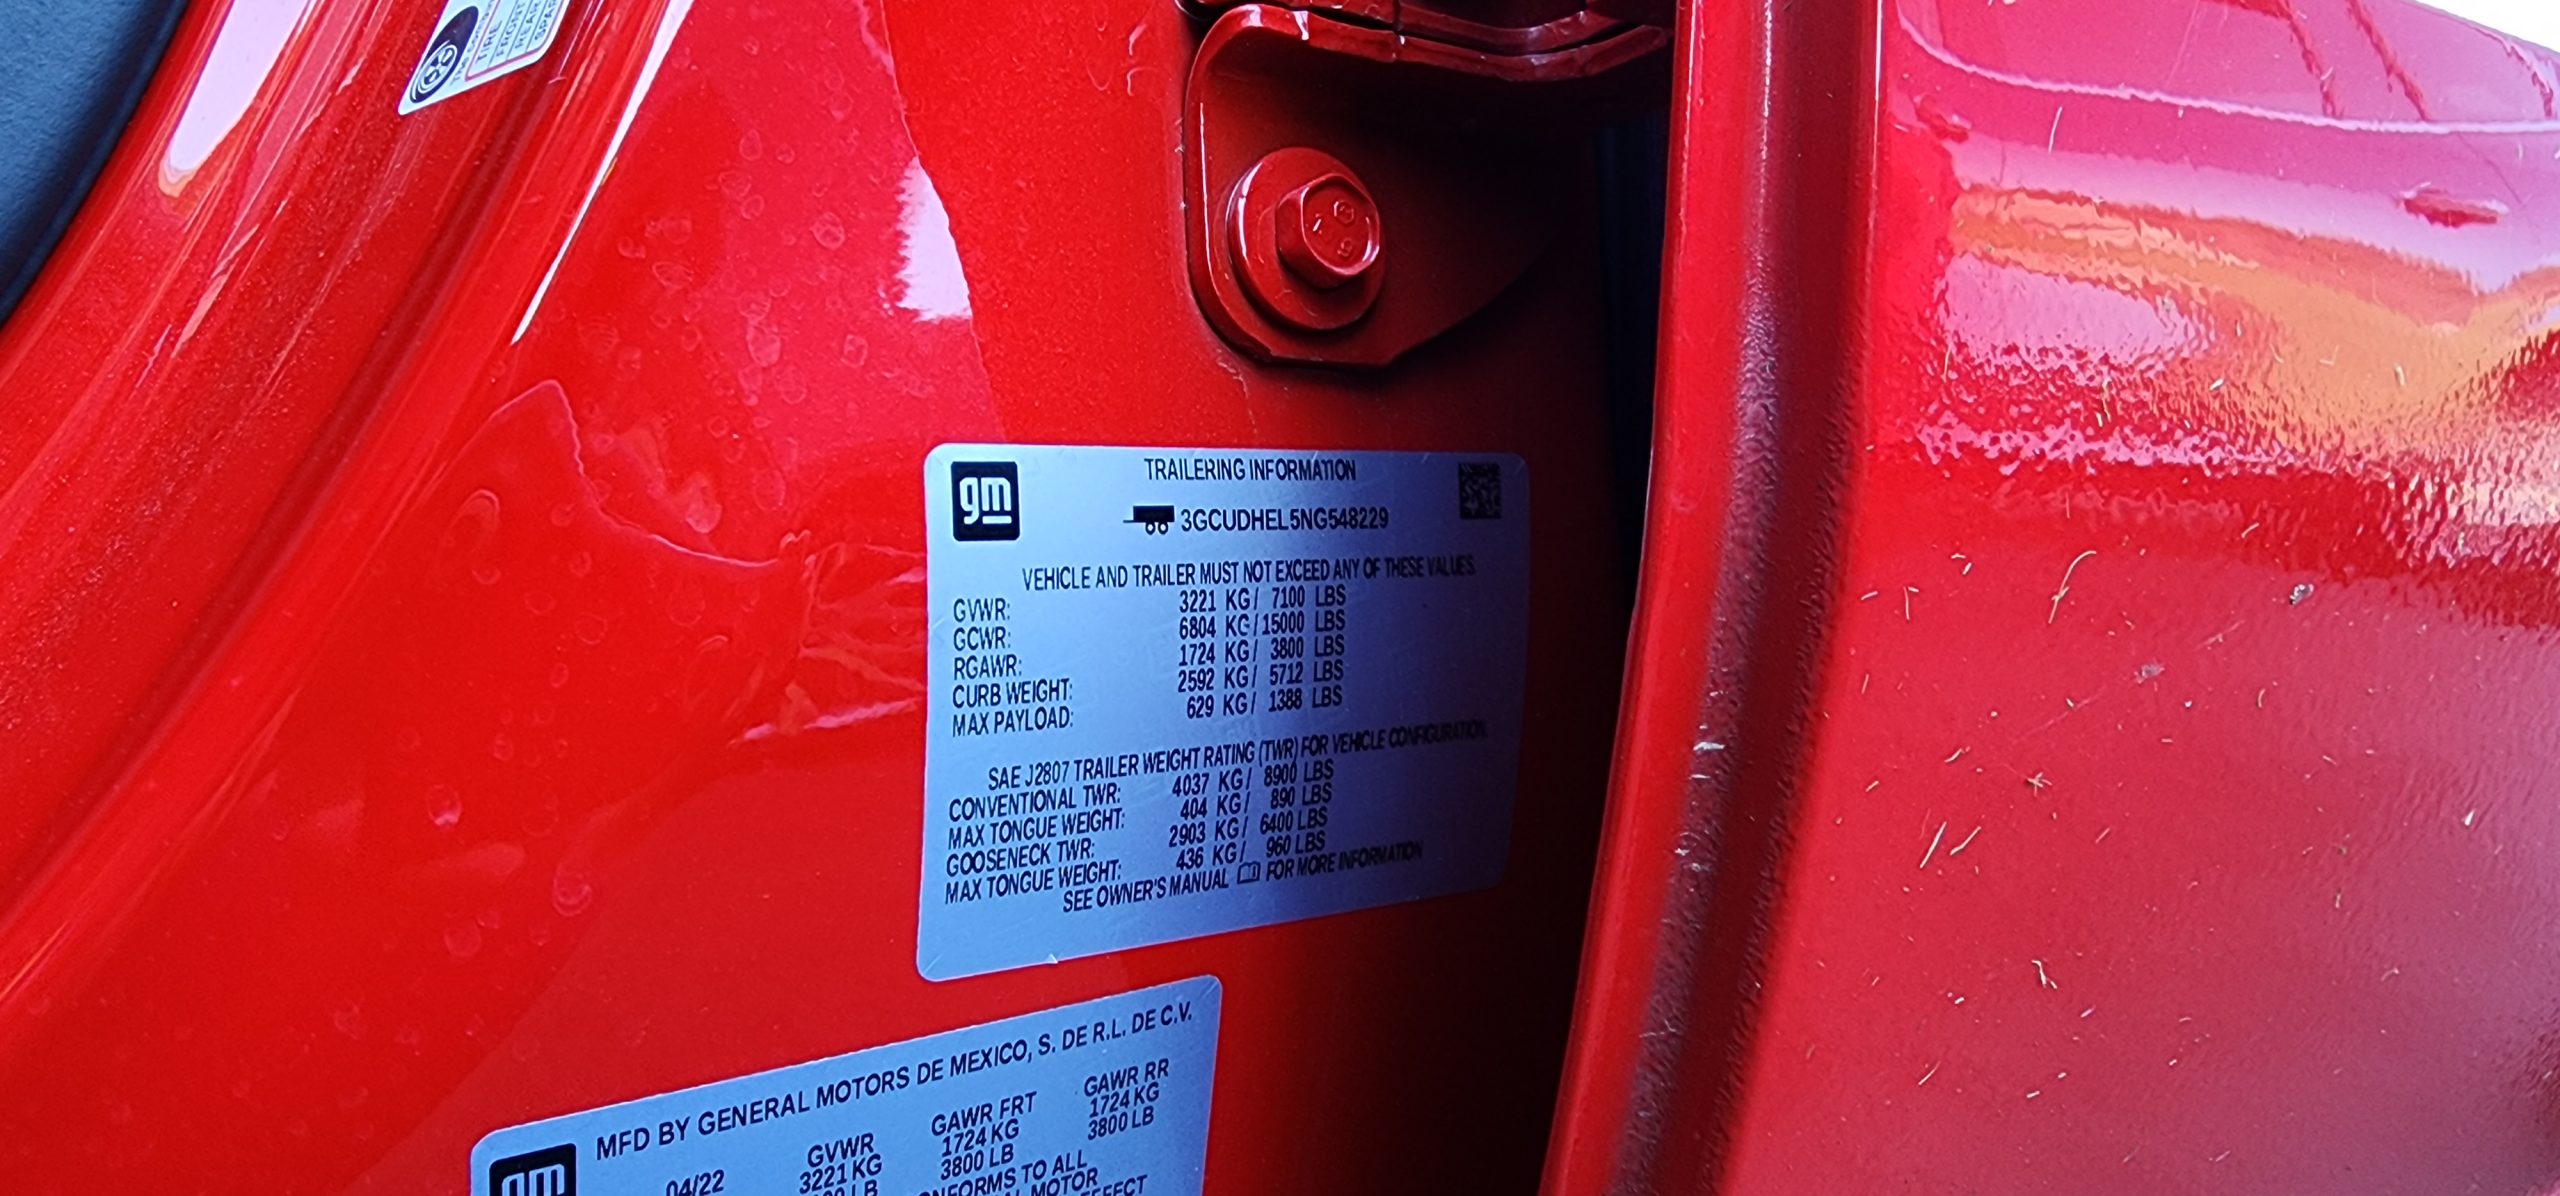
The driver-side door area carries information many owners barely notice, yet those small labels can prevent expensive mistakes. They tell you how much weight your vehicle can carry, which tires it was designed to use, how much air those tires need, and when the vehicle was manufactured.
Some figures are also essential when buying replacement tires, loading a pickup, checking a used vehicle, or investigating a possible modification.
The certification label and tire-information placard serve different purposes, and their exact positions can vary. Here are ten numbers worth understanding before you close the driver’s door.
1. The Month and Year of Manufacture
Look for a date on the vehicle certification label, usually attached to the driver’s door-latch post, door edge, or nearby hinge pillar. It may appear as a month and year, such as 06/24, meaning the vehicle was manufactured in June 2024.
This is not necessarily the same as the model year shown in advertisements or registration documents.
Under U.S. federal regulation 49 CFR § 567.4, the certification label must identify the month and year of manufacture. The regulation defines this as the period when work was completed at the vehicle’s main assembly location. It is therefore a production date, not the date the vehicle was first sold or registered.
Why does this small date matter? It can help identify the correct replacement parts, especially when a manufacturer changes components during a model year. Two vehicles carrying the same model-year designation may have been assembled months apart and may use different parts.
When ordering items such as belts, sensors, trim pieces, or certain electrical components, a parts department may ask for the production date alongside the VIN.
The date can also help when checking a used vehicle’s history. If a seller claims a car is a particular model year but its certification label shows a manufacturing date that seems inconsistent, ask for clarification.
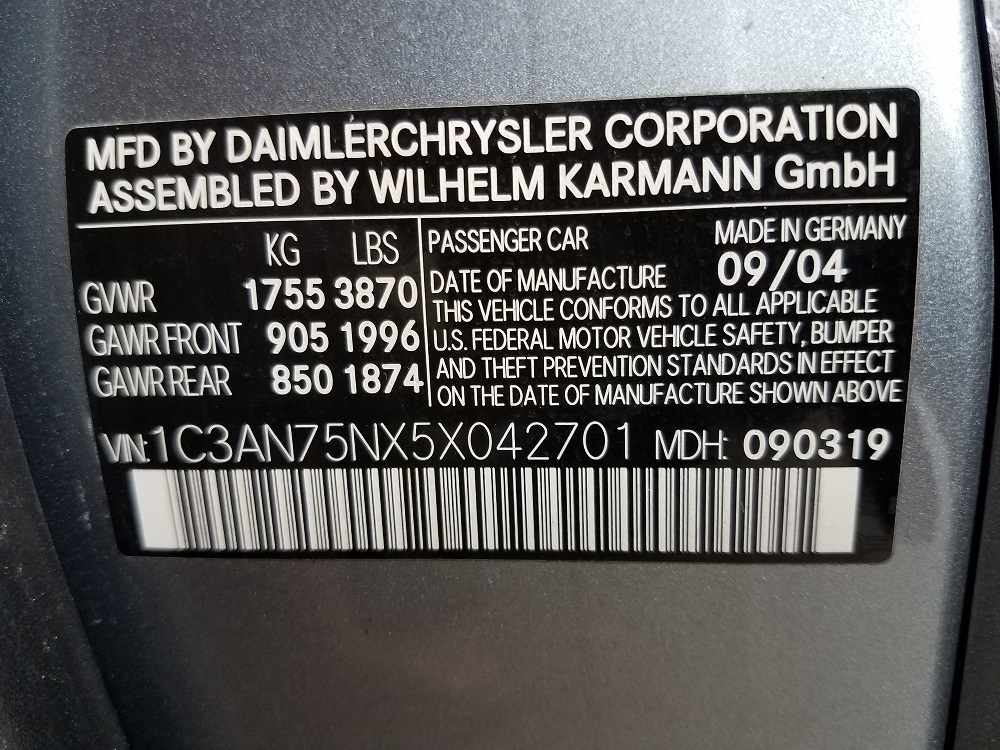
A later production date does not automatically mean a newer model year, since manufacturers commonly begin building the next model year before the calendar year changes.
Do not confuse this date with a tire’s manufacturing date. Tire age is identified by a separate DOT code on the tire sidewall, not by the door-jamb certification label.
2. Gross Vehicle Weight Rating (GVWR)
The GVWR is one of the most important figures printed on the certification label. It tells you the maximum permitted loaded weight of the complete vehicle, including the vehicle itself, occupants, fuel, accessories, and cargo. If the label lists a GVWR of 6,000 pounds, the vehicle must not be operated above that specified loaded weight.
Federal regulations require manufacturers to display the GVWR on the certification label. The rating is established by the manufacturer and is not simply the vehicle’s empty weight plus whatever a driver feels comfortable carrying. It reflects the vehicle’s design limits and must be respected when loading passengers, luggage, tools, or equipment.
This number is particularly important for pickup owners, people who tow, and drivers who regularly carry heavy loads. A truck may have a powerful engine and a large cargo bed, but that does not mean it can safely carry any amount of material placed inside it.
A heavy toolbox, bed cover, aftermarket bumper, passengers, and other accessories all contribute to the vehicle’s loaded weight.
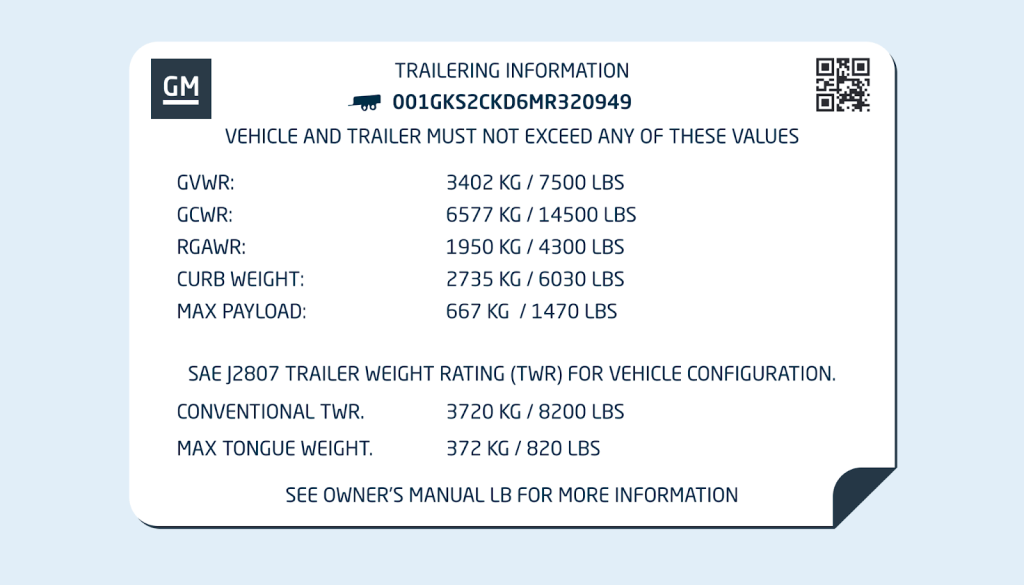
GVWR is also different from towing capacity. Towing capacity concerns the weight the vehicle is rated to pull under specified conditions. GVWR concerns the weight of the vehicle itself when loaded. A trailer’s tongue weight also adds to the load carried by the tow vehicle and must be accounted for.
Never treat GVWR as a target to exceed occasionally. Overloading can place additional stress on tires, brakes, suspension, and other components. If you regularly carry heavy equipment, check the vehicle’s actual loaded weight at a certified scale and compare it with the label’s limit.
3. Front Gross Axle Weight Rating (Front GAWR)
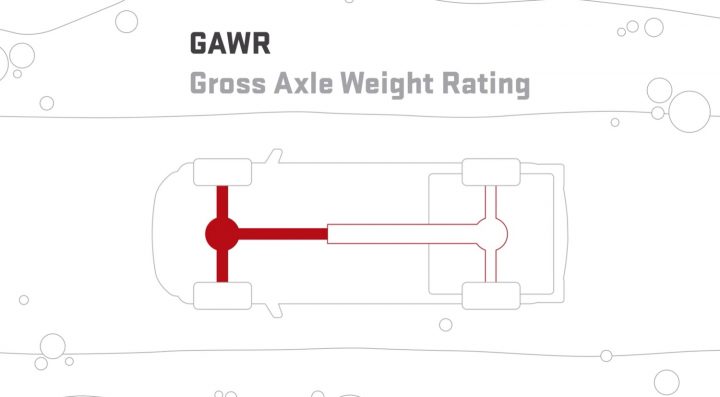
The front GAWR tells you the maximum weight the front axle assembly is rated to support. It is printed on the certification label, usually alongside the rear axle rating. If the front GAWR is listed as 3,200 pounds, the weight supported by the front axle must not exceed that figure.
This rating is not the same as the vehicle’s GVWR. GVWR limits the weight of the entire loaded vehicle, while GAWR applies to an individual axle. Both limits matter. A vehicle can remain below its total GVWR and still exceed the front axle rating if too much weight is concentrated over the front wheels.
This becomes particularly relevant when owners install heavy accessories. A steel bumper, winch, snowplow, or other equipment mounted at the front can add considerable weight to the front axle.
The same issue can arise when a truck carries heavy equipment in a position that changes how weight is distributed. An accessory advertised as compatible with a vehicle is not automatically suitable for every loading arrangement.
Federal certification rules require the manufacturer to state the GAWR for each axle, identified from front to rear. These ratings are established for the vehicle’s specified configuration and associated tire and wheel equipment.
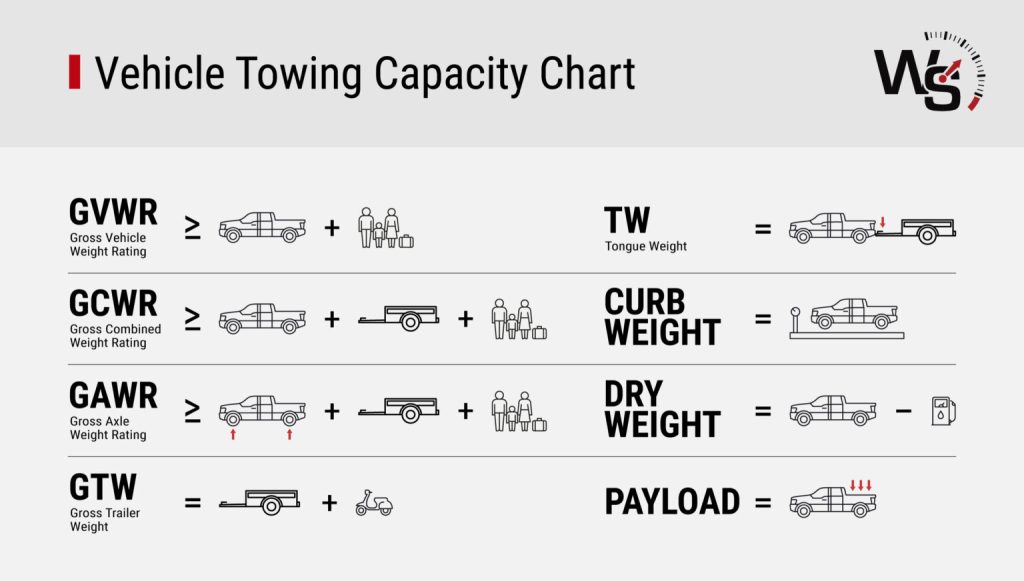
If you regularly carry heavy loads or have modified the front end, consider having the vehicle weighed axle by axle at a certified scale. A single total-weight reading cannot tell you whether the front axle is carrying too much.
The number is easy to overlook because it sits beside other technical information, but it matters for safe loading. Respecting the front GAWR helps avoid placing more weight on the front axle, tires, and related components than the manufacturer rated them to handle.
4. Rear Gross Axle Weight Rating (Rear GAWR)
The rear GAWR is especially important for pickup trucks, SUVs, vans, and vehicles that regularly carry cargo. It specifies the maximum weight the rear axle assembly is designed to support. The number appears on the certification label, usually directly beside the front GAWR.
Imagine a truck with a rear GAWR of 3,800 pounds. That is the maximum permitted load supported by its rear axle, not the amount of cargo that can be placed in the bed. The axle already supports part of the truck’s own weight, so the available capacity for passengers and cargo depends on the vehicle’s actual weight distribution.
A common mistake is to focus only on the advertised payload figure. Even if the total loaded vehicle remains below its GVWR, placing too much weight behind the cab can overload the rear axle. This is particularly relevant when carrying construction materials, motorcycles, heavy toolboxes, or equipment near the tailgate.
The manufacturer establishes front and rear GAWR values as part of the vehicle’s certification. Federal rules require the ratings to be listed in pounds for each axle.
A rear axle overload can place additional demands on the tires, suspension, brakes, and axle components. It can also affect handling, especially if the load is poorly secured or positioned. Drivers who frequently carry heavy cargo should check the owner’s manual for loading instructions and use a certified scale to measure the rear axle weight when necessary.
Do not assume that stronger aftermarket springs increase the official GAWR. Suspension modifications may change how a vehicle feels under load, but they do not automatically change the manufacturer’s certified axle rating.
5. Recommended Cold Tire Pressure
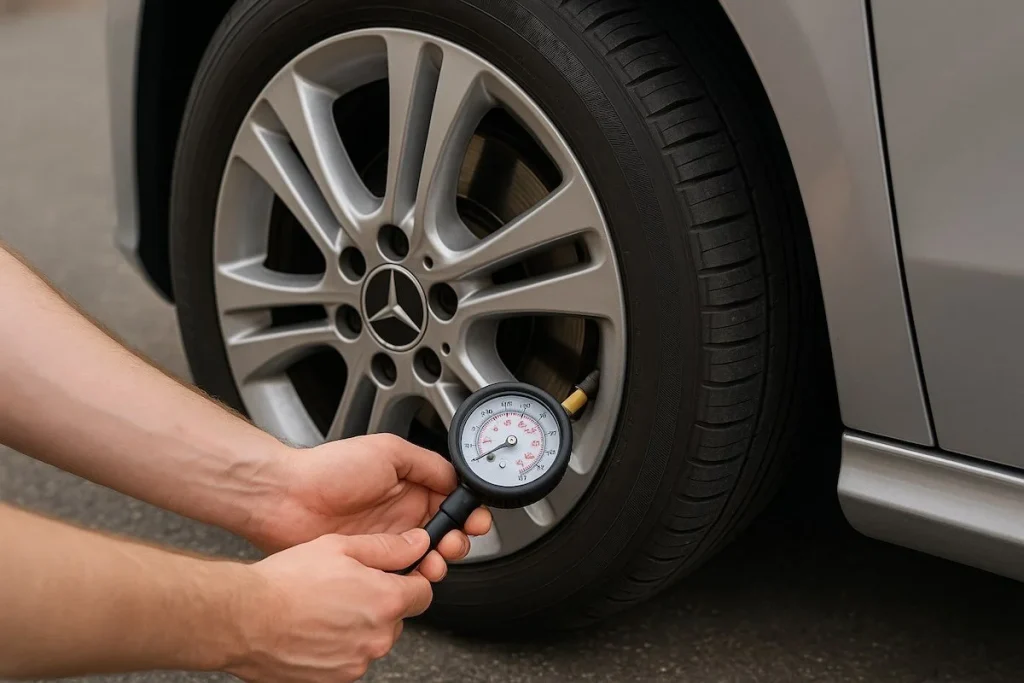
The tire-information placard usually lists the recommended cold inflation pressure for the vehicle’s original tire setup. It is commonly shown in PSI, or pounds per square inch, and may provide separate figures for front and rear tires. This is one of the most useful numbers on the driver’s door or B-pillar.
For example, a placard might specify 35 PSI for the front tires and 33 PSI for the rear. Those figures are vehicle-specific examples, not universal recommendations. Always follow the pressure printed on your own placard or specified by the manufacturer for the fitted tire configuration.
The word “cold” matters. Tire pressure should be checked when the vehicle has been parked for several hours or driven only a short distance. Driving heats the tires and increases the pressure reading. Releasing air from a warm tire just to match the cold-pressure figure can leave it underinflated once it cools.
The recommended pressure is not necessarily the maximum pressure printed on the tire sidewall. The sidewall figure generally identifies a tire limit under specified conditions, not the correct everyday setting for your particular vehicle. NHTSA advises drivers to use the pressure recommended by the vehicle manufacturer and check tires regularly.
Incorrect inflation can affect handling, braking, tread wear, and fuel economy. Underinflation can also cause excessive heat buildup, while overinflation may reduce the tire’s contact patch and contribute to uneven wear.
Check the placard whenever you replace tires, because the correct pressure depends on the vehicle’s specified setup. A reliable tire-pressure gauge is inexpensive, and checking monthly is a sensible habit. Do not rely only on a dashboard warning system, which may alert you after pressure has already fallen significantly.
6. Original Tire Size
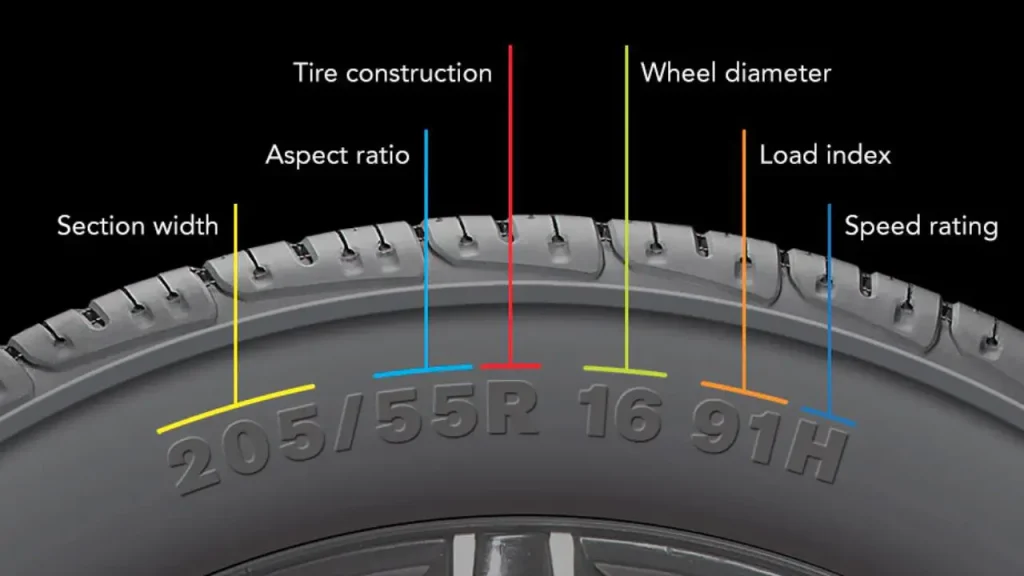
The tire-size entry tells you which tire dimensions the manufacturer specified for the vehicle. It is usually printed on the tire-information placard and may look something like P225/60R18. Each part of that code communicates a different measurement or construction detail.
In this example, 225 represents the tire’s section width in millimeters, 60 is its aspect ratio, R identifies radial construction, and 18 indicates the wheel diameter in inches. Although U.S. drivers commonly use PSI and pounds for vehicle loading, tire sizing still uses a combination of millimeters and inches.
Why does this matter? Two tires can look almost identical while having different load capacities, dimensions, or approved applications. Installing an unsuitable size can affect speedometer accuracy, handling, clearance, and the vehicle’s ability to carry its intended load. A tire that physically fits the wheel is not automatically suitable for the vehicle.
The original tire size is particularly useful when buying replacements online. Instead of relying on a seller’s description or guessing from the appearance of the existing tire, compare its specifications with the placard and owner’s manual. Some vehicles have different approved sizes for the front and rear axles, especially performance models with staggered tire setups.
Federal tire-information requirements include the specified tire size and corresponding inflation information on the vehicle placard. NHTSA’s tire-label inspection guidance also instructs inspectors to compare the installed tire size with the size listed on the placard.
If you want to switch to a different size for appearance or performance reasons, consult a qualified tire professional and verify load capacity, wheel compatibility, and manufacturer guidance first. The door-jamb specification is the safest starting point, not an invitation to fit any tire that happens to match the wheel diameter.
7. Spare Tire Size and Pressure
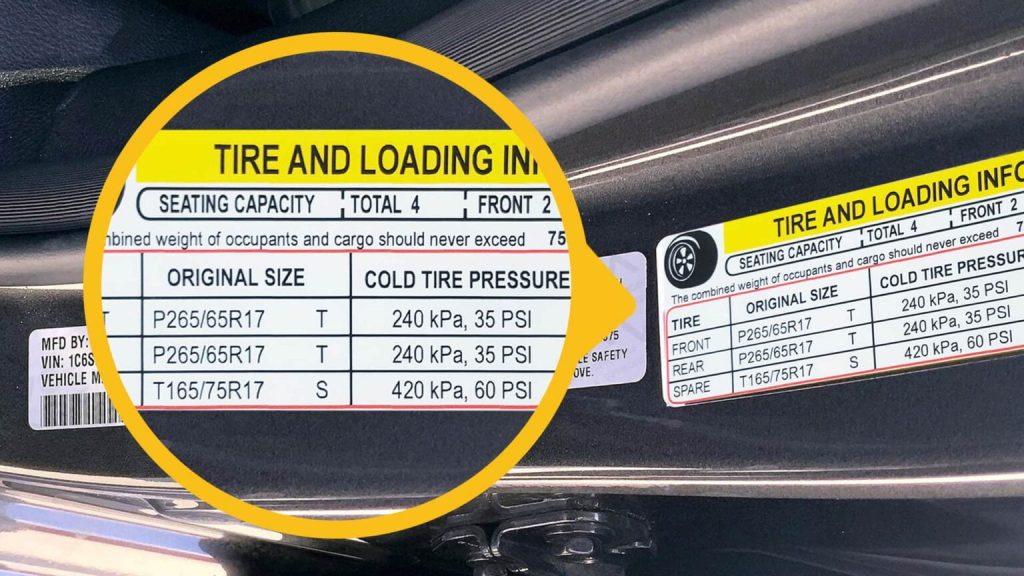
Some tire-information placards also list the size and recommended cold pressure for the spare tire. This entry is easy to ignore because the spare may spend years beneath the cargo floor or attached to the rear of an SUV without being used. When a flat occurs, however, those numbers suddenly become important.
A vehicle may carry a full-size spare, a temporary compact spare, or no spare at all. A compact spare often has a different size and a substantially higher inflation pressure than the regular road tires.
For example, a temporary spare might require 60 PSI, while the vehicle’s regular tires are specified at 35 PSI. These are illustrative figures only. The actual pressure must come from the vehicle’s placard, spare-tire label, or owner’s manual.
Using the wrong pressure can make a temporary spare unsafe or unsuitable for its intended purpose. A spare that has been sitting unused can also lose pressure over time. Checking it only after a puncture is too late, particularly if the vehicle does not have a pressure monitor for the spare.
NHTSA’s tire-information guidance identifies the placard as a source of tire size and cold inflation specifications, including spare-tire information where applicable.
Temporary spares also have operating restrictions. Their permitted speed and distance limits are usually printed on the tire itself or explained in the owner’s manual. They are intended to get the vehicle to a suitable repair location, not to replace a regular tire indefinitely.
If your vehicle has a tire repair kit instead, check its expiration date and make sure the compressor and sealant are present. The spare-related information on the door label can help you prepare before an emergency happens.
8. Seating Capacity
The seating-capacity figure tells you how many designated seating positions the vehicle is designed to provide. On the tire-and-loading information placard, it may appear as a total number alongside the front and rear seating arrangement. A five-seat vehicle, for example, may show two front positions and three rear positions.
This is not simply a comfort recommendation. Seating capacity is connected to the vehicle’s loading calculations and the number of occupants it is designed to accommodate. The federal tire-information placard requirements include seating capacity as part of the vehicle’s loading information.
The figure is useful when buying a used vehicle because it allows you to compare the original configuration with what is actually installed. If a seller advertises a seven-seat SUV but the placard and factory configuration indicate five designated positions, ask why. The vehicle may have been modified, or the advertisement may simply be incorrect.
Do not count every available space as an approved seating position. A cargo area, jump seat, or aftermarket bench does not automatically become a legal passenger seat. Proper seating positions require appropriate seat belts and must meet applicable safety requirements.

This number also matters when planning family trips. A vehicle’s seating capacity does not mean every passenger can be carried without considering their weight and the luggage being transported. The combined occupant-and-cargo limit still applies.
If a seat has been removed or added, check whether the modification complies with applicable requirements and whether it affects the vehicle’s certification or insurance arrangements. The original seating figure is a useful reference when evaluating whether the vehicle has been altered from its factory configuration.
9. Maximum Combined Weight of Occupants and Cargo
The tire-and-loading placard commonly includes a statement explaining that the combined weight of occupants and cargo must not exceed a specified number of pounds. This is one of the most practical figures on the label because it gives drivers a direct limit for the weight they add to the vehicle.
Suppose the placard states that occupants and cargo must not exceed 850 pounds. That allowance includes the driver, passengers, luggage, groceries, tools, and other items carried inside or on the vehicle. It is not an 850-pound luggage allowance after passengers have climbed aboard.
Consider a simple example. If the driver and three passengers together weigh 600 pounds, they have 250 pounds of the stated allowance remaining for cargo. Adding several heavy suitcases or equipment cases could use that remaining capacity quickly.
NHTSA’s tire-loading guidance explains that the placard provides the combined occupant-and-cargo weight limit and that drivers should not exceed the specified loading conditions.
This figure is especially important in smaller SUVs and passenger cars, where the available payload may be lower than drivers expect. A vehicle can have five seats but still have a limited weight allowance when all five positions are occupied. Seating capacity does not mean five adults can bring unlimited luggage.

The number also helps when comparing vehicles for work or family use. If you regularly carry passengers and equipment, check the placard before purchasing rather than assuming that a larger-looking vehicle has more payload.
Remember that the combined occupant-and-cargo limit does not override GVWR or either GAWR. All those limits must be respected simultaneously. A vehicle can remain within its combined payload allowance yet still exceed an axle rating if the load is concentrated in the wrong place.
10. Vehicle Identification Number (VIN)
The VIN is the vehicle’s unique identification code. On most modern U.S. passenger vehicles, it consists of 17 characters, combining letters and numbers. It appears on the certification label near the driver’s door area, although the VIN is also displayed in other locations, including the lower windshield area.
Unlike the other figures on the label, the VIN is not a weight or pressure specification. Its importance comes from identification. It connects the physical vehicle to its title, registration, recall information, insurance records, and many parts databases.
Federal regulations require the VIN to appear on the vehicle certification label. The same regulation specifies that the label must be permanently affixed in a location near the driver’s seating position, such as the door-latch post or hinge pillar.
When buying a used vehicle, compare the VIN on the door-jamb label with the number on the dashboard and the title documents. They should match. If one character differs, the seller should provide a clear explanation, and the discrepancy should be independently verified before the sale proceeds.
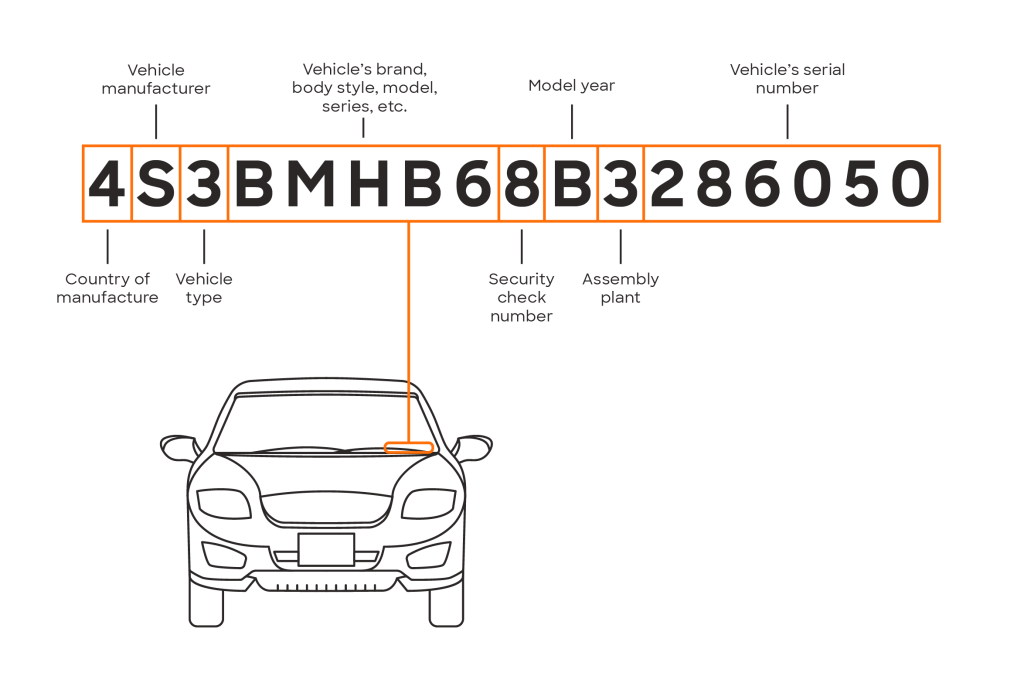
You can also use the VIN with NHTSA’s online decoder to retrieve manufacturer-reported vehicle information. It can help confirm the make, model, model year, and other details. The VIN can also be entered into NHTSA’s recall lookup to check for unrepaired safety recalls.
Pay attention to signs of tampering. A damaged label, unusual attachment, or inconsistent character spacing deserves further investigation. Do not assume a vehicle is legitimate simply because its paperwork looks convincing.
The VIN is worth recording somewhere secure. It can help when ordering parts, checking recalls, obtaining insurance quotes, or reporting a stolen vehicle. It is one of the most useful identifiers printed on the door-jamb certification label.